Integrate new firewalls into Panorama via CLI

I recently switched jobs and I am excited to announce that I am working with Palo Alto firewalls again. I am not gonna lie, I am beyond excited seeing PANs again. There is just something about them that I like.

As much as I love the UI it is somewhat annoying to integrate a new Palo Alto in Panorama. The reason is that PANs come with a standard configuration which has a standard security policy, virtual-wires and security zones. Now when you want to add it to Panorama this will cause some problems because it interferes with the config you want to push from Panorama. And after all, you want to get rid of any configuration that you may not use. Now you must click through the WebUI and delete the standard configuration in the correct order to avoid dependency errors. Just to hit “commit” and get another error thrown at you.

Hence I referred to the CLI and looked up all commands to wipe and stage a new device for our environment. I basically wanted to have a copy/paste deployment procedure to save time and drive standardization. The Palo Alto CLI is very capable and I was pleasantly surprised about the awesome readability of the commands. Below you will find my staging scripts for the local device and Panorama.


Example deployment “script” for PA firewall


For easier deployment, I build a small excel file that will build all the commands to

  • wipe the standard configuration
  • setup the management interface
  • set the panorama server
  • setup the interfaces so that interface configurations can be pushed via Panorama templates
  • setup HA
  • update the license
  • check and install dynamic updates
  • check and install software updates

Basic setup of 3 interfaces as layer 3 and port 7 and 8 for HA1/2:


# Setup MGMT interface

set deviceconfig system ip-address <MGMT-IP> netmask <netmask in X.X.X.X> default-gateway <default-gw-IP> dns-setting servers primary <primary-DNS>

# Setup Panorama server

set deviceconfig system panorama-server <IP/DNS of your Panorama Server>

# Delete standard config

delete network virtual-wire default-vwire

delete rulebase security rules rule1

delete zone trust

delete zone untrust

delete network interface ethernet ethernet1/1

delete network interface ethernet ethernet1/2

delete network interface ethernet ethernet1/3

delete network interface ethernet ethernet1/4

delete network interface ethernet ethernet1/5

delete network interface ethernet ethernet1/6

delete network interface ethernet ethernet1/7

delete network interface ethernet ethernet1/8

# Assign minimum configuration to network interfaces to be able to push Panorama templates

set network interface ethernet ethernet1/7 ha

set network interface ethernet ethernet1/7 comment HA1

set network interface ethernet ethernet1/8 ha

set network interface ethernet ethernet1/8 comment HA2

set network interface ethernet ethernet1/1 layer3 ip X.X.X.X/XX

set network interface ethernet ethernet1/1 comment <interface1comment>

set network interface ethernet ethernet1/2 layer3 ip X.X.X.X/XX

set network interface ethernet ethernet1/2 comment <interface2comment>

set network interface ethernet ethernet1/3 layer3 ip X.X.X.X/XX

set network interface ethernet ethernet1/3 comment <interface3comment>

set network virtual-router default interface ethernet1/1

set network virtual-router default interface ethernet1/2

set network virtual-router default interface ethernet1/3

# Setup hostname

set deviceconfig system hostname <hostname>

# Setup HA

set deviceconfig high-availability enabled yes

set deviceconfig high-availability group 1

set deviceconfig high-availability group 1 peer-ip X.X.X.X peer-ip-backup X.X.X.X

set deviceconfig high-availability interface ha1 port ethernet1/7

set deviceconfig high-availability interface ha1 ip-address X.X.X.X netmask X.X.X.X

set deviceconfig high-availability interface ha1-backup port management

set deviceconfig high-availability interface ha2 port ethernet1/8

set deviceconfig high-availability interface ha2 ip-address X.X.X.X netmask X.X.X.X

commit

# Update license on local firewall

request license fetch

# Check for App updates and install latest

request content upgrade check

request content upgrade download latest

request content upgrade install sync-to-peer yes version latest

# Check for AV updates and install latest

request anti-virus upgrade check

request anti-virus upgrade download latest

request anti-virus upgrade install sync-to-peer yes version latest


Example deployment “script” for Panorama


This will do the following on the Panorama Server:

  • Add serial number to Managed Devices
  • Clone a template
  • Create a template stack
  • Add templates to template stack
  • Add new device to template stack
  • Add new device to log-collector


set mgt-config devices <serial-nr>

# copy a template

copy template <template1> to <template2>

# Create template stack, add templates and add new device

set template-stack <template-stack>

set template-stack <template-stack> templates <template1>

set template-stack <template-stack> templates <template2>

set template-stack <template-stack> devices <serial-nr>

# Add new device to log collector

set log-collector-group default logfwd-setting devices <serial-nr> collectors <serial-nr-of-collector>


Hit commit and push the template to device (don’t forget to force values on first push).

No rocket science here, it is all very simple CLI commands, but maybe I will save someone some time to look up all these commands and it will for sure save you some time clicking through the WebUI and hitting dependency errors.

I used the commands above together with an excel file which will automatically put in IPs and serial numbers collected from a form. All commands are tested with version PAN-OS 8.0.4


Importing Palo Alto Firewall´s Policies into Microsoft Excel


Last week I started my second approach on importing the Policies (Ruleset) from our PaloAlto firewall into Microsoft Excel. I really love the way PaloAlto designed the web-interface on their Pan-OS: It has a cross-browser compatibility and works flawless on any screen resolution. Unfortunately, it is missing an option to export the policies into any standardized form, which would give me the possibility to keep a record of the ruleset outside the web-interface.

However, this was something I wanted to do for quite a while. More and more often we have the problem that system administrators complain about a missing transparency of the ruleset. This problem usually comes up when they are deploying a new service, and there is exactly one policy missing in order to complete the deployment.

One solution for that problem is granting a read-only access on the firewall. Downside: They have to be taught on how to use the web-interface and how to correctly read the policies. More important the will have access to other areas of the configuration, which may be considered sensitive or conflict with the goal of protecting sensitive data.

Presenting the ruleset in an Excel sheet is a good solution in order to address these problems: Everyone is able to open and read an Excel-sheet (Freeware viewers are also available). As a plus you can hide or exclude any information that is not necessary and likely people will know how to find the information they are looking for. On the other hand you have endless options on how to add additional information with the help of texts or conditional formatting.

Anyhow, enough for now – let´s start with the solution.

A while ago I already found two articles in the PaloAlto forums on how to import the Policies into Microsoft Excel. One is here: https://live.paloaltonetworks.com/docs/DOC-1617, the other one you will find here: https://live.paloaltonetworks.com/docs/DOC-5754. Unfortunately, both solutions didn´t work for me.

In fact, I got the following result using the tutorials:

palo_xml_import

As you can see, there is a new column for every source and target address. The reason is, that the every address-object is enclosed by <member> tags, which leads to a misinterpretation in the structure of the XML-file.

The advice from my co-worker was to use formulas in order to fix the layout. This didn´t seem to be the perfect solution for me, since I wanted a procedure which could be eas

ily reproduced by any other firewall-administrator.

After checking a few of the comments under the above stated links I found a comment mentioning a solution based on a linux bash command. After analyzing the command line I could adopt the procedure to a windows environment. Here is what you have to do (tested on Pan-OS 5.X with PAN-5050 and Google Chrome browser):

1)      Export your current running configuration:  In the web-interface you go to Device -> Setup -> Operations -> Export named configuration snapshot.

Step_1

2)      Open the configuration snapshot with a compatible text-editor (as Notepad++ for example).

3)      Search for string <security> (press Strg+H in most ext-editors) and deleted everything before the tag.

4)      Search for string </security> (press Strg+H in most ext-editors) and deleted everything after the tag. You now should have everything between <security> and </security>. Save the file (for security ;))

5)      Delete all tags <member> and </member>: Press Strg+H again for search and replace. Search for string <member> and replace it with nothing (delete it!). Do the same for the string </member>.

6)      Save the file as an XML document.

7)      Open Excel and import the XML file by clicking: Data -> Import –> other Sources –> XML-Dataimport and choose the XML file.

8)      As a result you should see your complete ruleset, where every rule is in exactly one row. However, there were slight layout problems caused by blanks in front of the address objects:

Step_2

You can easily fix that by using the replace-function again, and replace the blanks with nothing:

Step_3

As a side-note:  You can use that procedure also for importing the address-objects of your PAN-Firewall. In that case you have to import everything between <address> and </address> tags.

Side-Note 2: For additional XML settings you may want to activate the developers tab in Excel. It offers you additional features when working with XML data.

Palo Alto Firewall and ESX Session Time-Outs (Management)

Did you ever wonder how PAN firewalls are calculating session time-outs? I did, and it took me a while to find out about it. As you can see from my last post, it wasn´t the first time I was having problems with session timeouts and I´m pretty sure that there´s a ton of people having similar problems out there – so I want to share our results.

Scenario

pan_esx_sess

There is an ESX-server located in the Inside Zone of our firewall (let´s call it ESX-Management). It is opening SSL management connections to remote ESX-hosts located in the Outside zone (ESX-remote). The session timeout value was set to 4 hours. Unfortunately these sessions were running into timeouts because the PAN firewall was dropping them (we could verify that by checking the monitor tab and seeing the timeout counter running from 14400 to 0). On the other hand we could track a constant flow of heartbeat packets between the hosts. The ESX-management host kept sending heartbeat packages every 5-10 minutes in average.

Result and Issue

The result of that behavior was that the ESX-remote host ran out of sockets (the limit of ESX management connections is limited to a maximum of 321 connections), and therefore wasn´t manageable anymore. (HINT: restart esx management agent to reset all connections ‘/etc/init.d/mgmt-vmware restart’ )

We were able to identify the core problem very easily by entering the ‘netstat –an’ command in linux. The outpot showed us hundreds of established connections. However, when doing the same command on the ESX-management server it only showed us 3-4 active connections to the remote host. After that we checked the session in the PAN traffic monitor and found out that they were marked ‘ended’.

Conclusion: The ESX-management host was recognizing ended sessions, while the ESX-remote host kept the connections in established state-

Why is the PAN dropping sessions because of a timeout which have a constant flow of (heartbeat) packages?

The problem is related to the fact that PAN firewalls are doing session offloading, and data is processed by the data plane (see additional Info in PAN community: https://live.paloaltonetworks.com/docs/DOC-3950 or Wikipedia: http://en.wikipedia.org/wiki/SSL_acceleration). In case of session offloading  the PAN firewall needs a flow of 16 packets (unidirectional, so on one direction of the data-flow) in order to refresh the timeout timer. These values are for TCP sessions – as far as my information goes, UDP sessions need half the amount of packages (so 8 packages in one direction).

Conclusion and Fix

The conclusion you can make from the described the behavior is the following:

  • The application heartbeat value has to be at least 16 times shorter than the session timeout value set on the PAN firewall.

Or the other way around:

  • The application timeout value configured on the PAN firewall has to be changed to a 16 times higher value the heartbeat setting of the application. (You can change timeout values for every application in the objects tab).

For example: In our case the average heartbeat interval was 10 minutes. 16 multiplied by 10 = 160 Minutes. So we would have to set the session timeout value for the application ‘SSL’ to 9600 seconds (160 minutes) – or for a predefined application timeout of 1200 seconds, we would have to configure a heartbeat interval  of at least 75 seconds (1200 divided by 16 = 75).

As mentioned, the problem is related to the session offloading done by PAN firewalls. Taking this into concern, there is a second way to avoid session timeouts: Turn off session offloading. This can only be done via command-line.

To turn off hardware offload temporarily you can use the following commands (in PAN configure mode):
#set session offload no
or permanently with
#set deviceconfig setting session offload no (followed by commit).

As a result every heartbeat package will refresh the TTL timer, since the packages are not directly processed by the data plane. There´s no more need to send 16 packages in order to refresh the timer. In this case you only have to make sure, that the heartbeat interval from the application is smaller than the configured value on the PAN firewall. However there´s a big downside: The utilization of the data plane increases. Somewhere in the forums I read that disabling session offloading can decrease the total throughput by 15%.

PAN (Palo Alto) firewalls and flapping Cisco WLC data/control paths

Just yesterday we migrated to a (Palo Alto Networks) PAN-5050 firewall in active-passive configuration. After that we experienced problems with flapping control and data paths between our foreign and anchor WLCs (Wireless LAN Controller). In this article I will describe a possible solution for flapping data/control paths in a Palo Alto / Checkpoint firewall environment. Scroll down to ‘Solution’ to skip preamble.

Our set up: We have four Cisco 4402 Series WLCs which are located in remote affiliates. These ‘foreign WLCs’ set up etherchannels to an ‘anchor WLC’, which is located in one of our DMZs.

After changing our firewall from Cisco to PAN we experienced flapping data and control paths. Investigation led to assumption that the direction of initialization was somehow related to the flapping. Cisco´s documentation says that the WLC with the lower MAC-Address is initializing the etherchannel. This is leading to the first conclusion:

  • It´s important to know which side is initiating the etherchannel. As a result you may want to implement bidirectional rules for easier handling. Otherwise make sure that your firewall rules match the traffic flow.

The goal of this first step was to make sure that no more packages are dropped. As with PAN-OS 5.0.3 and AppVer 365-1733 (03/26/13) the Application were detected correctly (etherip and cisco-wlc-mobility). Only one thing seems a little bit weird: The traffic log says that etherip is using Port 0 (I´m not sure about that one). However, we were still experiencing flapping paths.

PAN_values

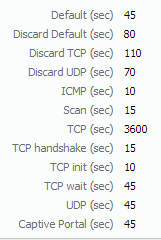
In the second step we changed the values for the timeouts on application level (on the PAN you can set customized values for TCP/UDP timeouts under Objects > Applications tab). Unfortunately the paths still didn´t stop flapping.

SOLUTION: After that we changed the default values for the session timeouts (you´ll find them under Device > Setup > Session Tab in PAN-OS) and rebooted the foreign as well as the Anchor WLCs and all Data and Control Paths seem to work fine. In the picture you will find the values which worked for me.

As to my surprise this behavior/problem doesn´t seem to be Palo Alto specific. In fact I found a topic on the Cisco Support forums where someone is having the same problems with a Checkpoint firewall. So this fix might be a general fix for problems with WLC data or control paths.

Palo Alto Networks Migration Tool for Firewalls (First experience)

Palo Alto Networks Tool for Firewall Migration

In the last days I spent a couple of hours playing around with the Palo Alto Migration Tool. Basically, this tool is designed to automatically convert configurations from third-party firewalls into a suitable PAN configuration. While it´s obvious that a conversation can´t be done without manual corrections, I was still curious about how much help this tool really can be.

Scenario

In my scenario I want to migrate from a Cisco ASA firewall to a PAN-5050. The Cisco Firewall configuration currently holds:

– 900 address objects

– 300 address groups

– 150 service objects

– 90 service groups

– 500 policies

The tool itself

Some words about the tool: First of all it´s a little bit tricky to get access to the tool. It´s not accessible via the Palo Alto community, nor you will find a public download. The best way is to contact your regional Palo Alto sales manager or engineer. The will likely send you a link for accessing the tool. However, they probably won´t give you support in using the tool as it´s originally designed for PAN partners and distributors.

The tool comes as a VMWare image based on Cent-OS. You can run it on an ESX server or just your local box in VMWare Workstation or the free player. After the first start you can log into the command line and configure the network settings. After setting the network configuration you will be able to access the VMWare via http. The GUI of the tool will remind you of the PAN Firewall´s webinterface.


What the tool does

After doing some configuration you can now import configuration files from the following manufacturer: Checkpoint, Cisco, Netscreen, Fortinet, Palo Alto, Sidewinder.

Notice: The following information is based on importing a Cisco ASA configuration.

After importing the ASA configuration as .txt file you have a split screen: On the left side you can find interfaces&zones, static routes and all objects (Addresses, Address groups, service groups, etc.). On the right side you find some logging information from the import, as well as the Security Policy Editor and a tab for NAT configuration.

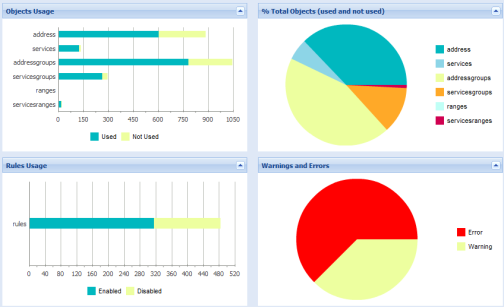
On the top is a small navigation bar with a limit set of buttons: For instance you can generate a report which is giving you information about how many objects are used/unused.

 PAN Migration tool Analyzer

For me this was a good starting-point, as it gives me concrete figures on how much has to migrated.

Now you can start editing the configuration. The look&feel of the configuration is pretty much the same as it would be on the PAN itself. Here I want to give you some more detailed information on the tool´s behaviour:

–          Address objects: Adress objects from the ASA were imported in the following way: Adress objects with a subnet  mask of /32 were imported with the prefic ‘H-‘, while address objects with any subnetmask smaller then /32 were im ported with the prefix ‘N-‘ (‘H-‘ for Host, ‘N-‘ for network). Also they get a suffix with the CIDR number. Here´s an example:

ASA address object PAN address object
Name             192.168.1.5
IP                  192.168.1.5
Subnet-Mask   255.255.255.255
Name              H-192.168.1.5-32
IP                   192.168.1.5
Subnet-Mask   255.255.255.255
Name             192.168.1.0
IP                  192.168.1.0
Subnet-Mask   255.255.255.0
Name              N-192.168.1.0-24
IP                   192.168.1.0
Subnet-Mask    255.255.255.0

–          The conversation of Address and Service groups is done 1:1.

–          The conversation of services is done by adding a prefix followed by a port number. The tool is automatically creating a new service object (because PANs configuration only work based on service objects) for every service defined in the ASA config.

ASA service PAN service object
tcp 135 tcp-135
udp 255 udp-255

–          Service ranges: The tool automatically creates service objects for defined service ranges.

ASA service range definition PAN service object
udp >59999 Name:     Range-59999-65534
Protocol:  udp

–          Security policies: In the first step all rules have the same source and destination zones – however, after clicking the ‘auto assign zone’ button, all policies are matching the correct source and destination zones. There also buttons for activating, deactivating, deleting and merging rules.
The only behavior I didn´t like was the following: In the ASA config we had several rules which contained of single addresses aswell as address groups in their source or destination zone. In this case the tool is creating a new address group which is including the hosts as address objects and the address groups itself. The new created group then gets named ‘DM_INLINE_NETWORK_NUMBER’. Let me give you an example for better understanding:

ASA rule PAN rule
Source        88.88.88.88
Destination  Address-Group-1 (address group),
Address-Group-2 (address group),
192.168.0.5 (host),
192.168.12.5 (host)
Service       icmp
Source Zone         Outside
Destination Zone   Inside
Source                 H-88.88.88.88-32
Destination           DM_INLINE_NETWORK_1
Application            icmp

First of all, the tool is translating the IP-addresses to the according security zones. After that it creates an address object for the destination host. Then tool creates a new address group called DM_INLINE_NETWORK_1 which is containing: Address-Group-1, Address-Group-2, H-192.168.0.5-32, H-192.168.12.5-32. The problem with that behavior is that you are facing a lot of new address groups which have consecutive numbers. There are only two ways out of that: Either you have an ASA configuration which only contains address groups or you manually correct it in the tool or on your PAN firewall after importing the configuration. This behavior is analog with service groups: Whenever there is a rule containing single services and service groups, the tool will create a new service group which contains both entries. Those groups get the Name ‘DM_INLINE_TCP_XX’.

The generation and import of the config worked – only some smaller errors were reported (like 20 rules couldn´t not be applied on the PAN- I will do some further investigation on that before I start blaming the tool). Please note that you don´t have a fully running config after the import of the generated config. As you import a clean config (included are only the police set, objects, etc.) you will have to reconfigure some things you may have configured before. For example: the interfaces (zones, IP-addresses, router), HA, Logging, Log Forward, Alerting and so on. You should really keep that in mind after importing a configuration which was generated out of the migration tool! DON`T FORGET TO CONFIGURE THE MANAGEMENT INTERFACE 😉

Bottom Line

What the tool can do for you:

–           Convert address/service objects

–           Convert address/service groups

–           Convert interfaces to zones

–           Convert static routes

–           Convert security rules (with zones and applications)

–           Check which objects are not used

What you have to do:

–           Review everything

–           Take care of address-group problem mentioned earlier

–           Configure interfaces and associate them to virtual routers and virtual systems

–           Reconfigure the basic parameters (like HA, etc.)

In my opinion, the tool is doing a great job in the preparation phase of a firewall migration project. It saves you a lot of work with migrating objects and policy rules automatically. For me it´s perfect to create a ‘basic configuration’, which can be applied on the PAN firewalls.

[Workaround] Policy Hit Counter on PaloAlto firewalls

This week I was attending a workshop on PaloAlto firewalls. PaloAlto (PA) firewalls became famous when Gartner scored them on a top position in their 2011´s magic quadrant for enterprise firewalls (see here).

Long story short: It´s absolutely amazing how many features their firewalls offer. All features can be fully administrated via a nice looking web-interface. On the other hand I experienced, that there are some smaller features missing, which can be very useful in daily use.

One of those features is a hit counter for policies (or let´s call them rules). One main thing about firewalls is that you define rulesets on how traffic is forwarded or blocked. There may always be rules which are never used – like those which are setup up to prevent possible attacks. On the other hand a low hit number can also mean that a rule isn´t set up properly and the administrator should have a second look over it. A hit counter can also be useful for troubleshooting purposes since the administrator gets a fast feedback if packets are blocked from particular zones. At least our administrators are used to work with those counters as Cisco is offering policy hit counter in their ASA firewall line for a long time.

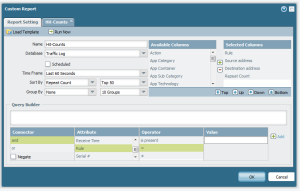
Unfortunately Pan-OS (that´s the name of the PaloAlto´s firewall software) doesn´t offer such a feature in their current release (4.1.6). Here is where you can make advantage of the highly customizable reporting function of PA firewalls. Go to the management interface under the tab Monitor you´ll find the menu “Manage Custom Reports”. Here you can add a new report with the following attributes:

Name: Hit Counter
Database: Traffic Log
Time Frame: whatever you want (probably 60 seconds or 15 minutes is a good value for troubleshooting).
Sort by: Repeat Count – Top 50
Selected Columns: Rule, Source address, destination address, Repeat Count

HitCounter

Setting up a Hit Counter on PaloAlto firewalls with customized reports.

After that, hit the “Run Now” button and you will see a report showing you a table with the top 50 used rules. However this probably won´t help you with rules which are only used a few times (their hit counter is too low to be shown in the top 50 list). This is where you can make use of the query builder, located under the report settings. As shown in the image you can use the query builder to define the rule that you want to keep track of.

I know this solution isn´t as useful as a hit counter itself, but at least it gives administrator an easy way to get some information on rule usage – plus it can be done automatically with the schedule function.